
Access Platform / Scissor Lift Machine
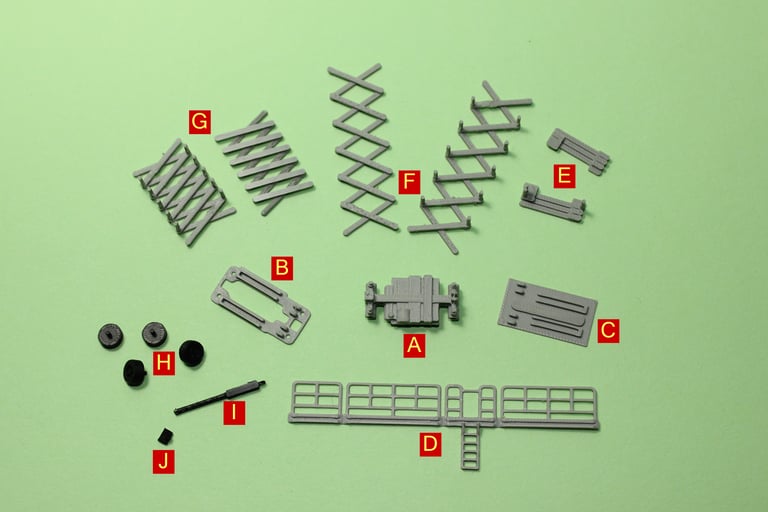
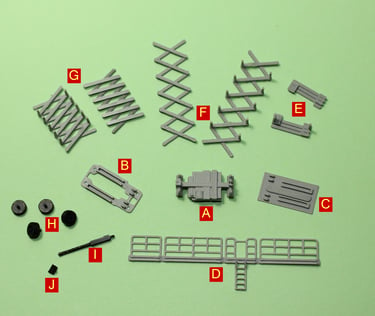
Kit Contents
A - Vehicle chassis
B - Base for scissors
C - Work platform
D - Work platform side railings and access ladder
E - Closed scissor parts (option 1)
F - Full lift scissor parts (option 2)
G - Partial lift scissor parts (option 3)
H - Wheels
I - Hydraulic ram
J - Control panel
Build Instructions
After deciding which scissor height to be used start with the part with the pins attached and apply a small drop of glue to the top of each pin. Then carefully position the mating half on top, making sure the alignment is true and the scissor arms are level top and bottom.
Taking the constructed scissors, apply blobs of glue to the end of the four arms at one end. Now position on the base (B), such that one pair of scissor ends sit in the smaller of the two pairs of notches on the base.
Take the side railing (D) and apply beads/drops of glue along the slotted channels. Take the platform (C) and position the edge near the two small notches to the side railings, such that the notches are facing towards the ladder and it sits in the slotted channel. Now carefully wrap the side railings around the platform. Use a piece of tape to hold the two meeting side until set. Make sure that the assembly looks square, there is some play to make subtle adjustment. It is important that the platform/railings are orientated as described, if not the ladder will foul the vehicle chassis!
It is now time to paint all the grey parts prior to final assembly.
Taking the chassis {A) puts drops of glue on the four pins and lower the scissor lift/base onto it. Note that the base only sits one way round.
Taking the scissor/base assembly apply four drops of glue to the tops on the scissors. Now position the platform/railing assembly on top of the scissors, such that one pair sit in the smaller of the notches.
The wheels (H) can now by put in place by first applying drops of glue to the four axle holes in the chassis. Now slot each wheel axle into the axle holes.
Taking the hydraulic ram (I), cut the long section (the piston) down to length (as necessary) such that it can be positioned inside/up to the scissors. Apply a drop of glue to the small locating notch on the chassis and position the ram.
Finally fit the control panel (J), chose you location on the side railings and apply a drop of glue. Now have fun hooking the control panel over the railing on to the glue. Use of tweezers and a magnifier may help.
APB Creative Minds - 3D printed and laser cut creations
info@apbcreativeminds.com
©2024-2026. All rights reserved.