
Cherry Picker Machine
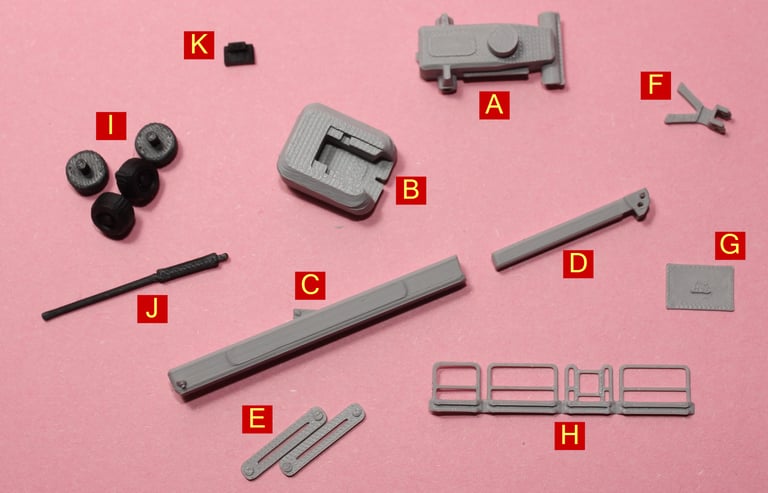
Kit Contents
A - Vehicle chassis
B - Machine body
C - Main boom
D - Inner boom
E - Basket arms
F - Basket attachment knuckle
G - Basket base
H - Basket side rails
I - Wheels
J - Hydraulic ram
K - Control panel
Build Instructions
Starting with the basket side rails (H) apply a bead/drops of glue in the slotted channels. Then take the basket base (G) and position a short side into the channel near the access gate, noting the small triangle on the base must face the bottom of the basket. Use a small piece of tape to hold the railings together where the two ends meet.
Take the two basket arms (E) and glue together to form one piece, noting the parts have nipples on each side at each end, there must face outwards.
Join the main boom (C) to the inner boom (D), by inserting the inner into the end of the main boom and set to you desired position. Glueing should not be necessary as these are a tight fit, and this also allows for some adjustment later on.
One the basket assemble has set the basket knuckle (F) can be glued to the base of the basket. Use the small raised triangle to help with alignment.
It's now time to assemble the parts just prepared into a final position. Apply glue to the four nipples of the basket arm assembly and slot one end into the inner boom and the other into the basket knuckle. Set the parts into your desired position and allow to set in place. Make sure all the parts look true and the basket is sitting parallel to the ground for your given pose.
It is probably a good time to part all the parts to the required colour.
Paint the hydraulic ram (J) piston a silver.
Final assembly can now take place, start by taking the vehicle chassis (A) and applying drops of glue to each of the four axle holes. Now slot in each wheel (I).
Fit the machine body (B) to the chassis assemble. Glueing is not generally required and does allow the machine to be turned later if necessary.
Taking the boom and basket assembly apply drops of glue to the two pins on the main boom and position on to the machine body within the corresponding slots. Prop the boom/basket in the required position and allow to set.
Take the hydraulic ram and determine the required piston length and cut. Apply a drop of glue to the small pin and position within the receiving slot on the body. Note, this will be a tight fit and may require the rams pin to be squashed a little, it's suggested to use some flat nose plyers to achieve the necessary adjustment.
APB Creative Minds - 3D printed and laser cut creations
info@apbcreativeminds.com
©2024-2026. All rights reserved.